
If you have:
- Signed up on Olabs as a translator,
- Accepted the Translator Agreement and
- Filled in your Personal Information,
The next step is to create a demo for the language pair in which you would like to get jobs assigned. Let’s follow the steps to create a demo.
On your Olabs dashboard, expand the left-hand side menu and select Demo. You can also access the Demo menu via this URL.  Olabs > Demo
On this page, click the New Language Pair button.
 On the window that opens, select the Demo Type and the Source and Target Languages for your demo.
 Demo>New Language Pair
Here’s a list of field descriptions:
- Demo Type: Select one of the three available types of demos: Closed Captioning (CC), Subtitling and AI Dubbing.
- Source Language: Select the source language from which you wish to translate.
- Target Language: Select the target language to which you wish to translate. (For Closed Captioning Demos, this field is selected automatically.)
Make your selections and click the Create New Language Pair button. If you're unsure about what type of demo you should create, contact our Project Management team.
After your demo is created, it will be listed on the Demo page, with the status New Demo.
 Demo>New Demo
Simply click the Start the Demo button to begin working on your demo.
 Demo>Starting the Demo
Now that you’ve learned how to create a demo, let’s dive deeper into each demo type.
Closed Captioning (CC) Demos
 New Language Pair>Closed Captioning (CC) Demo
For Closed Captioning (CC) Demos, we expect you to:
- Watch the source video,
- Transcribe the source audio/speech based on Ollang’s General Requirements Guideline for Subtitling and Closed Captioning and
- Synchronize the transcribed subtitles with the source video.
Let’s explore the functionalities on the Olabs Studio:

Video Player: Play/Pause the source video to start transcribing.
Pause While Typing: If you enable this feature, the video will be paused whenever you start writing in the text boxes on the right-hand panel.
Guideline: Click this button to access Ollang’s guidelines where you can find general demo requirements.
Search: You can use this function to search for a specific text or phrase. Within search, you can also replace texts.
Go to Line: Enter a line number and press Enter to jump to that line, i.e. text box.
+Add New Box: Initially, the right-hand panel appears blank. Click this button to start adding text boxes.
Timecode Tray: As the video is being played, you can see the green timer moving forward. Pressing the + icon at the top of the timer creates a text box at the specified timestamp.
Olabs Studio>Closed Captioning (CC) Demo
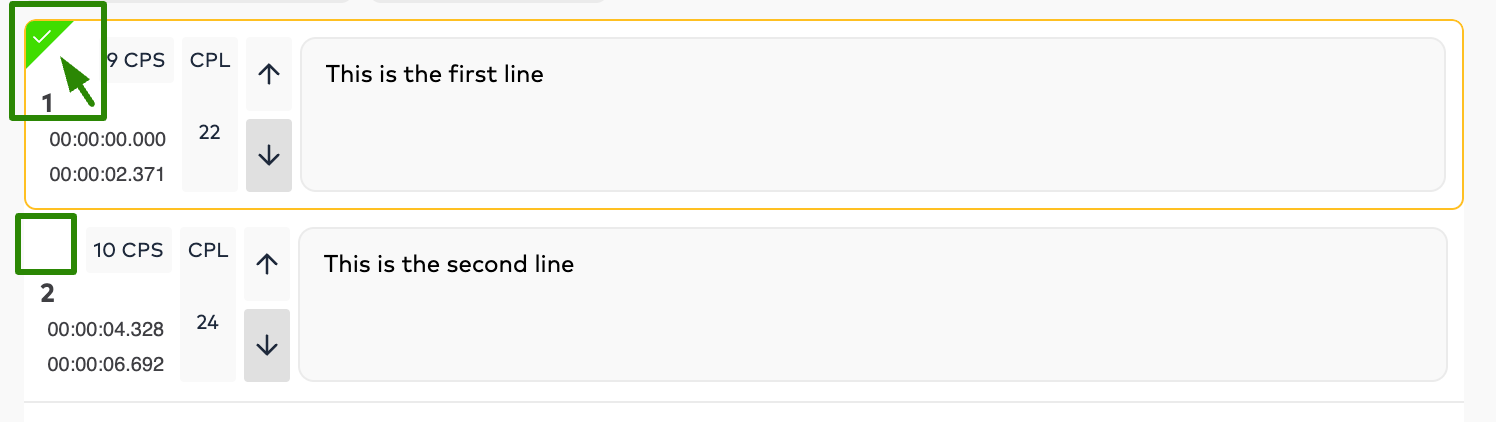
Up & Down Buttons: Use these buttons to change the position of the text on the source video.
Subtitle Box: This is a text box where you need to enter the transcribed or translated text. In order to save your line, click the green checkmark on the upper-left corner of each box.
Timing Box: Once you enter and save the text, it’s displayed in a box on the timecode tray. You can position this timing box to align the text with the audio waveform.
Progress: This information is updated dynamically based on your current progress on the demo.
Last Saved Time: This indicates the last time changes are saved.
Error & Warnings: You cannot submit a demo unless you correct all the indicated errors. The correction of red boxes, i.e. errors, is mandatory. Yellow boxes are warnings that are recommended to be corrected, but they are not mandatory.
Deliver Job: After completing the demo and review your work, if you have cleared all errors, click this button to deliver it..
Clicking the Deliver Job button will take you back to the Demo page where you can see the status of the related demo change to Checking. This means your demo has been submitted and is waiting to be evaluated by our team.
Subtitling Demos
 New Language Pair>Subtitling Demo
For Subtitling Demos, we expect you to:
- Watch the source video,
- Translate the provided script based on Ollang’s General Requirements Guideline for Subtitling and Closed Captioning and
- Synchronize the subtitles with the source video.
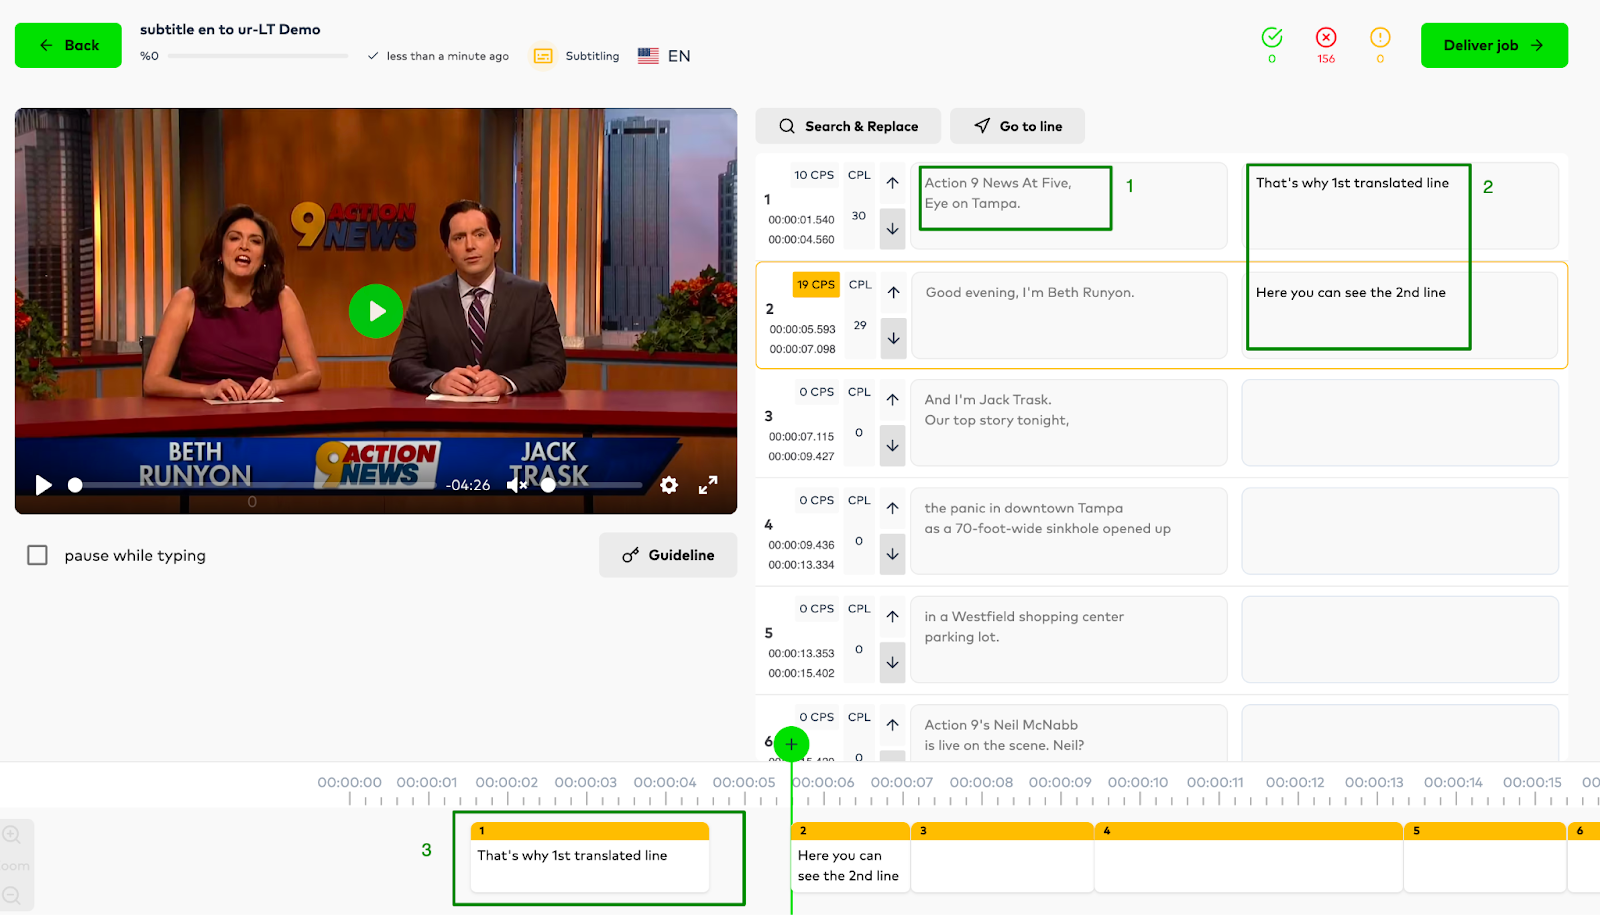
- Source Text: For Subtitling Demos, the source script will be provided on the left column.
- Subtitle: You are expected to translate the source script on the left and enter the translation in the relevant boxes on the right column.
- Timing Box: As you enter the translated texts in boxes, they are displayed on the timecode tray within timing boxes.
AI Dubbing Demos
 New Language Pair>AI Dubbing Demo
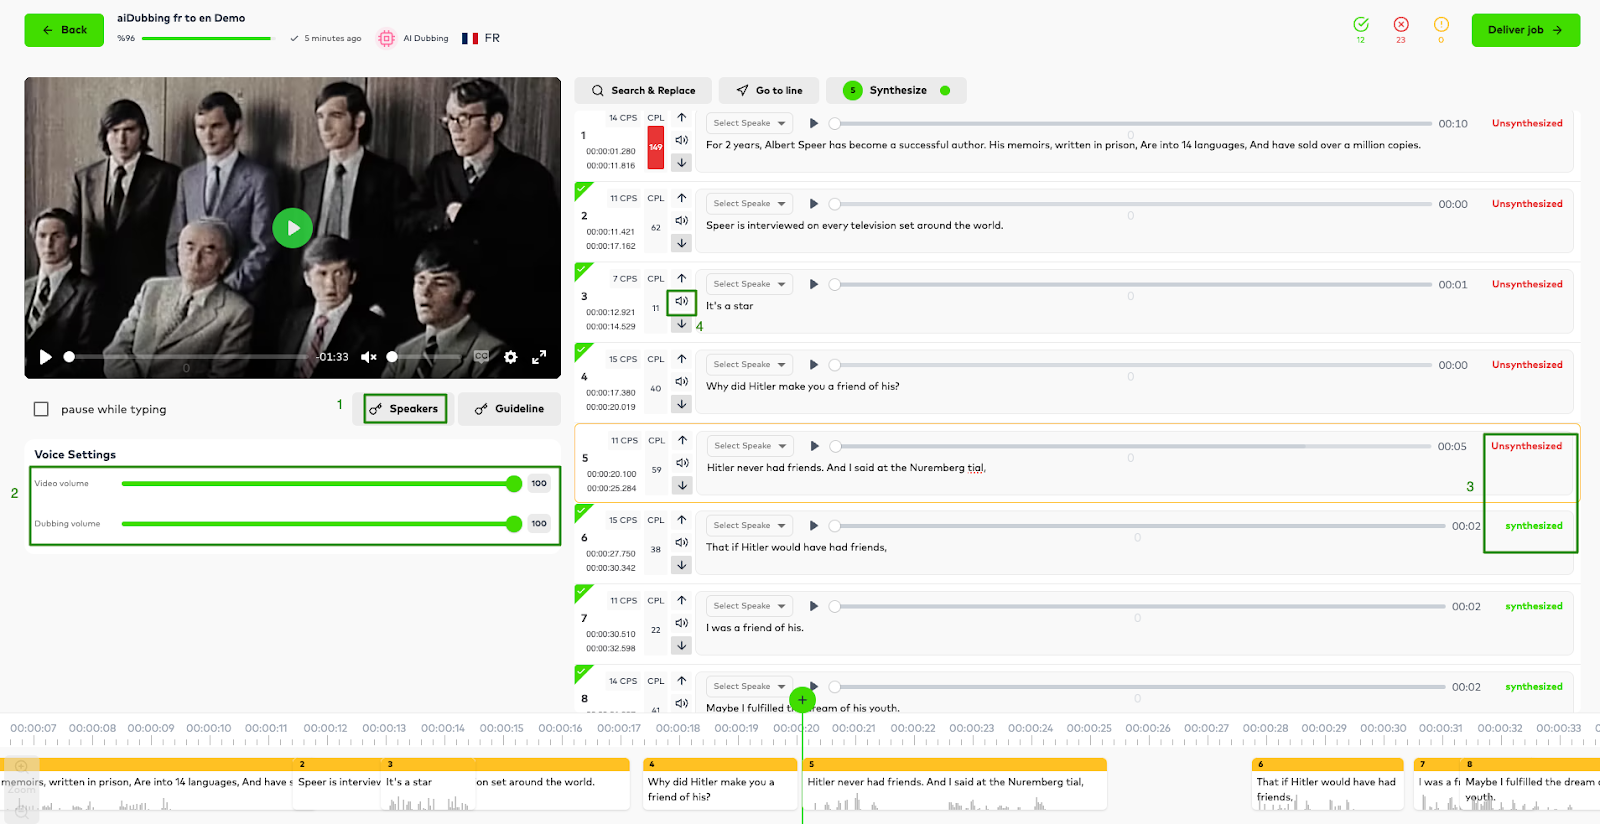
Speakers: You need to select a speaker for each box, i.e. line, on the right. Click the Speakers button under the video player to see a list of the existing speakers. You can also create a new speaker from scratch and assign an AI voice to that speaker.
Video & Dubbing Volumes: The Video Volume bar controls the volume of the source video while the Dubbing Volume bar controls the volume of the AI voices in the dubbed video.
Synthesize: After finalizing the text and saving it, click the Synthesize button at the top. You need to synthesize each line (also after making changes) before delivering.
Voice Settings: Each line has an option to manipulate a few attributes of the AI voice. Click the volume icon, next to the CPS value, to access these attributes. You can change the Volume, Rate, and Pitch of the selected AI voice based on the requirements of the work
Olabs Studio>AI Dubbing Demo>Voice Settings
After you assign a speaker with an AI voice to each box and save the work, you need to review it. For this, you can play the video by increasing the Dubbing Volume to get an idea as to how the final video sounds like.
For AI Dubbing Demos, we expect you to:
Select an AI Speaker: You need to select a speaker for each box and assign an AI Voice.
In order to create new speakers, click the Speakers button under the video player. Once you create a new speaker, it will be reflected amongst the rest of the speakers listed within the Select Speaker dropdown on each box. Let’s create a new speaker together 🙂
Here’s how you can name a speaker:
When you click Next, a preview window will be displayed where you can assign an AI voice to this speaker. You can choose any Voice Provider.
In order to listen to how the AI voice sounds, enter a text in the box after selecting a voice and click the Sound icon down below.
Synthesize: This step allows you to merge the text with the AI speaker you’ve selected in order to generate AI audio. If you wish to manipulate the AI voice, simply click the Voice Settings icon on each box. On the displayed window, you can see three settings: Volume, Rate, and Pitch
Let’s briefly discover the functionalities of Voice Settings
Volume: Use this setting to change the volume of the selected speaker. You can use it to distinguish between primary and secondary speakers in a scene.
Rate: Use this setting to change the speech rate of the selected speaker. You can use it to speed up/down the speech to better synchronize the dubbing with the source video.
Pitch: Use this setting to change the pitch of the selected speaker. You can use it to distinguish between speakers shouting or murmuring.
Synchronize: You’re also expected to synchronize the dubbed content with the source video to ensure that the AI Voice accurately overlaps with the original voices.
For detailed information about our AI Dubbing Studio, you can refer to Ollang’s AI Dubbing Guideline.
Here are the dubbing styles Ollang offers to clients:
- Overdub: A dubbing technique where the original audio can be heard, and the new audio is added on top of it.
- Lip-sync: A dubbing technique that synchronizes the spoken audio with the lip movements of the speaker on the screen.